Thursday, December 18, 2014

4:40 PM

GIF image optimization

Recently I had to optimize a gallery of some 20,000 GIF and looking for programs that can do massive way (batch process), I was doing a lot of testing with several of these applications and finally chose three programs that enable such optimizations.
  • Absolute GIF Optimizer. It is most convenient to use, will you indicate a folder and practically with a button optimizes you all. ( official website of Absolute GIF Optimizer )
  • Advanced GIF Optimizer. It optimizes GIF folder by folder, ie not automatically allow subfolders. In the trial version only optimizes 20 images every time the button is pressed optimize why you should go giving the button until optimizes all images in a folder. ( official website of Advanced GIF Optimizer )
  • RIOT. It's a little more complicated, you can tell that want to optimize a folder and all its subfolders, but optimized GIFs saves only one folder. So there you go optimizing GIF folder by folder. Allows two different types of compression. It also has the pluggin version of XnView and GIMP. ( RIOT official website )
These are the screenshots of the three programs. If you are curious to see them, click on the image to enlarge.

Tests performed with the 3 GIF optimizers highlights

On the compressibility depends on the images, but of the three tests with the three programs these are the results:
Test 1, 205 optimizing GIF files.
Original: 20,791,385 bytes
Compressed with Advanced GIF Optimizer 4: 20,785,193 bytes
Compressed with the Absolute GIF Optimizer 1.01: 20,785,193 bytes
Compressed with XnView and pluggin RIOT 2 (NeuQuant-Neural net): 20,211,232 bytes
Compressed with XnView and pluggin RIOT (Xiaolin gu-color): 10,649,543 bytes
Test 2, 103 optimizand GIF files.
Original: 4,649,692 bytes
Compressed with Advanced GIF Optimizer 4: 4627374 bytes
Compressed with XnView and pluggin RIOT: 4,564,074 bytes
Compressed with the Absolute GIF Optimizer 1.01: 4,507,113 bytes
Test 3, optimizing GIF 20,453 !!!
Original: 1,895,003,874 bytes
Compressed with Advanced GIF Optimizer: 1,891,304,678 bytes
Compressed with the Absolute GIF Optimizer: 1,891,261,124 bytes
Compressed with XnView and pluggin: 1,064,442,248 bytes

Conclusions:

To optimize GIF files massively, the best program to compress GIF files is the RIOT, with compression option "Xiaolin gu-color." It is a bit heavy to do it folder by folder, but the result is amazing and apparently there is no difference between the original image and the compressed image.
Worst of all the the Advanced GIF Optimizer, which besides being uncomfortable to use, compresses very little.
4:38 PM

Changing the EXIF ​​metadata of multiple photos and images JPG, GIF and PNG

To change the metadata (or also called metatags) in JPG, GIF and PNG files, ie hidden tags of the images, there are few known methods. Tired of trying things, number 15 program that I downloaded I finally found what I wanted.
Not only can modify metadata JPG, GIF, etc, can be changed almost all metadata of all graphic formats .
For example if you have a collection of photos that you have made yourself and want to "protect" so that if you copy them to another site, you can easily prove that they are yours by entering your copyright in the metadata of the image.
If someone changes the picture with Photoshop, this program will respect the metadata and the "copycat" will not notice that you are hanging pictures on your website to test covertly inserted crime.
Let us practice, you must first download these two applications to change the metadata:
1. ExifTool v9.13 . To decompress the compressed file, the file "exiftool (-k) .exe" appears. It is a program that runs on put him written commands, but as it is quite boring do use the following program to make everything easier and visual.
2. ExiftoolGUI v5.15 . When you unzip the "exiftoolgui" folder with multiple files and folders inside appears. This program was hung in the forum of the official website ExifToolGUI program .
Now you must rename the "exiftool (-k) .exe" file "exiftool.exe" and copy it into the "exiftoolgui" folder. And we can start, run the program ExifToolGUI.exe.
cambiar-los-metadatos-de-imagenes To the left of the folder tree (1) appears, locate the folder that contains the images you want to change the metadata. In the center (2) the image files appear and clicking on one of the images in the window on the right (3) all metadata appear (press the "ALL" button to see them all).
With the selected image (s), press the button at the bottom that says "ExifTool direct" (4), and two boxes will be blank. Now in the box above (5) (right after where it says "Command (press Enter to execute)" have to write what you want.
For example, the text we introduce metadata "Comments" on our copyright:
-file: Comment = "(c) 2013 http://www.drpc.es/"
(When you finish writing, press the "Enter" key to make the order is fulfilled)
If you copy and paste the above line, check that the quotes are correct lest you an error message appears. WordPress tends to change the "straight quotes" with "rare" quotes.
If there are many images, it sometimes seems that the program has crashed. If this happens, you have to be patient and wait a bit. If it really has been posted, it Try to go for parties (eg folder by folder), sometimes if the program finds corrupt images, becomes unstable.
Also we put it in the metadata "Artist":
-Exif: Artist = "(c) 2013 http://www.drpc.es/"
We recommend using these two previous lines, as the metadata "Comment" you support the JPG and GIF, but do not support PNG. In contrast, the metadata "Artist" is supported by JPG and PNG, but not GIF. Thus if you use the first line and then the second, you ensure that all files of any graphics format, are identified with your text.
If you want to change the metadata to all graphics files that have the folder that you have selected and all subfolders, use the "-r" before the command, for example:
-r -File: Comment = "(c) 2013 http://www.drpc.es/"
-r -Exif: Artist = "(c) 2013 http://www.drpc.es/"
And if you want to change the metadata only the JPG and TIF files, you can do the following:
-r -File: Comment = "(c) 2013 http://www.drpc.es/" -ext jpg tif -ext
-r -Exif: Artist = "(c) 2013 http://www.drpc.es/" -ext jpg tif -ext
4:34 PM

New hard drive, with transfers at very low speed (solved)

In recent times have appeared on the market a new Seagate hard drives or Type Digital Western "Caviar Black", "Caviar Green" or "Caviar Blue" (SATA 32MB or 64MB cache), which have high capacities Data Storage: 1TB, 1.5TB or 2TB.

The problem of low speed

The problem with these disks is that when connected to the PC have very low speeds and CPU consumption becomes very high, slowing the entire Windows to the point that when files on a disk are copied to the new, everything goes so slow that is exasperating.
Modern hard drives transfer data at a speed of 60 MB / s or more, but when these "modern" hard drives are an average of "1.5 MB / s" ends the patience of anyone, eg to copy 100GB to another hard disk, you can represent leave the PC on all night and into the next day (when they are ultra modern and very fast disks).
If simple tests are performed, all indicate no problems. For example scanning the surface of the hard disk itself Windows utility called "Error Checking" or software as "Tuneup Utilities", it can be ... one week checking the entire hard drive !!.
If "more serious" as the software called "HD Tune Pro", tests are done appear all SMART parameters (technical data are internal hard disk) as perfect and the disk is in perfect health.
But with "HD Tune Pro" an obvious fault shown, the speed is very slow. This is the result of a Western Digital 1.5TB disk. You can see how it goes very slow with transfers between 1.4 and 1.7 MB / s:
Disco duro muy lento Apparently in China and Japan this is a fairly common problem, perhaps because of errors in the translation affecting Windows or who knows. If you Google "WD 低速 病" appear hundreds of pages talking about the hard drives too slow.

Solutions

After many tests, we found several solutions, so that if a solution does not work, try the other. Here we can see the image of the hard drive repaired. Despite the strange error in the area of ​​25 GB, the speed of the hard disk that we used for this article, has been multiplied by 100.Disco duro despues de reparar

Solution 1.

The steps we are very simple:
  • If you can set in your BIOS, try changing the hard disk configuration to ACHI, this forces you to use the DMA data transfers.
  • If you can set in your BIOS, increases the minimum temperature alarm on your hard drive. For example if from 40 degrees is activated or deactivated something, increasing the temperature to 50 degrees.
  • The most important and almost always works:
  1. Click on the "Start" button.
  2. Click on "Run".
  3. Type "regedit" (without the quotes).
  4. Search the registry HKEY_LOCAL_MACHINE \ SYSTEM \ CurrentControlSet \ Control \ Class \ {4D36E96A-E325-11CE-BFC1-08002BE10318} \ 000x
  5. The last four digits should be 0000, 0001, 0002, 0003, 0004, ....
  6. Go to each of these records and delete everything that has these values: MasterIdDataChecksum SlaveIdDataChecksum
  7. Restart the computer so that Windows can detect the DMA settings again.

Solution 2, if the above fails.

Change SATA port. To do this follow these steps:
  1. Turn off the PC.
  2. Open the PC and look for the cable connecting the SATA hard disk with the system board (motherboard). Connect the cable to another connector on the motherboard.
  3. If necessary, set the BIOS to recognize the hard drive.
  4. Turn on the PC.
  5. Te message detection software will appear and if all goes well you will see the typical message "new hardware installed correctly" or a similar message. All right!

Solution 3, if the above fails.

If all else fails, you could try the driver. You have to force Windows to reinstall the hard disk driver. The steps for Windows XP are:
  1. Button Start, Control Panel, Administrative Tools, Services, Windows Seach, click it Right, Stop, Properties, Off.
  2. Button Start, All Programs, Start, right-click on Start, delete.
  3. Open any folder, enter the "My Computer" folder to see the hard disk. Right-click over the hard drive and click on properties. There click to deselect the "Allow indexing ..." (or similar) option.
  4. Click OK, select "Apply changes to the folder and subfolders. SI error messages should ignore. And this is it, this latter process takes too long in some cases, it takes patience.
Well, we hope that some of these tricks you've helped solve the problem, thanks for your attention.
4:32 PM

How to disable autocorrect Word (all versions)

If you're sick of the corrector Microsoft Word change the words without your permission and causing your more complex texts are full of errors, we will summarize what you should do, to disable the self-corrector all versions of Microsoft Word.
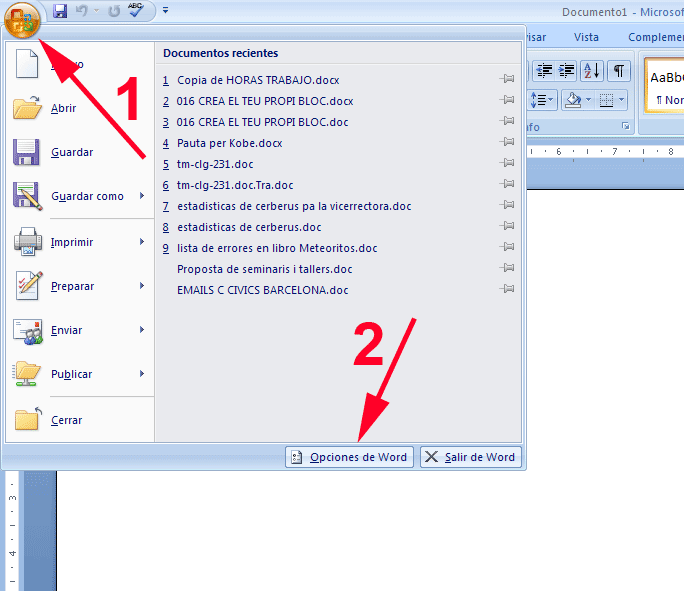
encontrar opciones para configurar del MS Word
Where are the options in Word? (Click to enlarge)
 

AutoCorrect Microsoft Word 2007 and Word 2010

  • Top left click "Microsoft Office button" (the button with a circle).
  • Bottom right, click "Word Options".
  • On the left, click on "Review" (or "Correction").
  • Top right, click "AutoCorrect Options".
  • In the "AutoCorrect" tab, in the central area of ​​the box, deselect "Replace text as you type".

AutoCorrect Microsoft Word 2007 and 2010 (in English)

  • Top left click "Microsoft Office button" (the button with a circle).
  • Bottom right, click "Word Options".
  • On the left, click on "Proofing" (or "Revised").
  • Top right, click "Autocorrect Options".
  • In the "Autocorrect" tab, in the central area of ​​the box, deselect "Replace text as you type".

AutoCorrector Microsoft Word 2003 and Word XP

  • In the top menu, click on the "Tools" option.
  • Click on "AutoCorrect Options".
  • Disable the "Replace text as you type" option.
  • Disable "Automatically use suggestions from the spelling checker".
Sometimes this does not work above, just in case also perform the following steps:
  • "Tools" menu.
  • Click on "Options".
  • Click on the "Spelling and Grammar".
  • Disable the "Check spelling as you type" option.

AutoCorrector Microsoft Word 2003 and Word XP (in English)

  • In the top menu, click on the "Tools" option.
  • Click on "Autocorrect options".
  • Disable the "Replace text as you type" option.
4:29 PM

How to have 2 or more users on a PC via Remote Desktop

There is a fairly simple way to have a good pc and that several users to connect to the PC and can work all at once. For example at home you can have a well equipped computer and several "loose" computers that connect to the "good" computer. Another example would be a classroom in a school with old computers that connect to a new computer (called "server").
For this, the server PC will need to have enough hard drive, be fast and above all have a lot of memory (4 GB or more). The basic scheme is the following:
In our case, we have a server PC (with Windows Seven) and 3 PCs (Windows XP) to work remotely with Remote Desktop Server. Everything will be connected via network (using the Switch). This would not matter if the PC Usuario1es a bad old PC, the speed depends on how good the server and run programs that use memory Server.
The steps to get to have 2 or more users on a PC via Remote Desktop are:
1. Go to the Server and create the accounts "User1", "User2" and "User3" (or necessary). This is done with the "Button Start -> Control Panel -> User Accounts and Family Safety -> Add or remove user accounts".
Como agregar cuentas de usuario en Windows Seven
2. On the server, go to System Properties and the "Remote" tab, click the "Remote Desktop" box, check the "Allow users to connect remotely to this computer".
This is done by clicking on:
Button Start -> Settings -> Control Panel -> System and Security -> System -> (1) Advanced System Settings -> (2) tab "Remote Access" -> (3) Enable the "Allow connections Assistance remotely to this computer "-> (4) Select the option" Allow connections from computers running any version of Remote Desktop (less secure) ".
Activar acceso remoto mediante asistencia remota en Windows Seven
3. At the same location as step 2, click the "Select Remote Users" button and select the users "User1", "User2" and "User3". Now give the "OK" button and then again "OK". 
4. Now click on the client PCs that: (1) Start button -> (2) Programs-> (3) Accessories -> (4) Remote Desktop Connection.
Conexion a escritorio remoto
5. If you can not connect to the server using the options: "(1) Equipment: -> View more", connecting directly by IP Server by typing eg "192.168.1.3" or "\\ 192.168.1.3 \" (without quotation marks) or a similar IP.
Conectarse a escritorio remoto con Windows XP
In the box (1) is where you have to type the IP of the server, with the "Options" button (2), you can configure more advanced things, for example you can automatically connect to the server, without asking the user name nor the password.
6. There is a problem, by default Windows Seven will not let connect to multiple users simultaneously. To fix the geniuses of deepxw.blogspot.com.es are scheduled software that easily fix the problem:
  • Go to your PC server and download this software: Universal Termsrv.dll patch (if the link above does not work, we have a copy on our server ).
  • Simply download the program, if you have a 32-bit Windows run the "UniversalTermsrvPatch-x86.exe" program. Or if you have installed a 64-bit Windows run "UniversalTermsrvPatch-x64.exe". Once you have executed the corresponding program, click the "Patch" button. Finally restart the PC.
imagen del software Universal Termsrv.dll Patch
And finally, if anyone finds it useful:
If the server has Windows Vista or Seven or later, and before the start is entered directly without asking the user and password, you can fix running (press the "Ctrl + R" keys) a program of Windows called "netplwiz ". Once running, select the desired user, and uncheck the box that says "Users must enter a user name and password to use this computer".
4:27 PM

Uninstalling AVI Chunk Viewer (Fixed)

Are you tired of a window that appears whenever you select a video or modified their name? Do you happen to have the tocanarices window on top the title "AVI Chunk Viewer"?
Avi chunk viewer quitar To remove program is so heavy that informs us of any errors or not in the videos is pretty straightforward. Usually the "AVI Chunk Viewer" is installed automatically with the K-Lite Codec Pack or the like.
We explain to serving AVI Chunk Viewer, do a tutorial step by step with the official version to uninstall the damn program and if that does not work the official version, the version explained away "by storm" AVI Chunk Viewer :

What use is the AVI Chunk Viewer?

It is used among other things, to split AVI video (MPEG4, XviD, DivX, etc) into smaller AVI files. This allows for example that if a video is damaged, your film viewer (your player) can skip the damaged parts and display they are correct. Usually used by the Media Player Classic program, but if for example you have the wonderful display of VLC movies, you do not need and you can uninstall without problems. It also integrates into the Windows Explorer (not Internet Explorer, otherwise the Explorer, the process that handles the desktop and lets you browse folders on your hard drive).

Officially removing the AVI Chunk Viewer

The box of "AVI Chunk Viewer" comes from an integrated within the explorer.exe program, called "AviSplitter.ax" whose official name is "Avi Splitter" and its creator is the company module Gabest . It is no virus or anything, in theory it is a (very heavy course) utility that comes from the "Media Player Classic" (it is a program for watching videos) and the source code of both the "Media Player Classic" and the "AviSplitter .ax "is open to any programmer who wants to revise or improve it, can download it from the web SourceForge .
The "AviSplitter.ax" 362 KB module is activated when certain types of AVI file, especially if it is damaged is selected and that is when the annoying box "AVI Chunk viever" we all know appears.
The steps to uninstall the module are:
  1. Go to:
    Start button -> K-Lite Codec Pack -> Tools -> Codec Tweak Tool
    Or if you do not find to have another (older) version of K-Lite searches:
    Start button -> K-Lite Codec Pack -> Configuration -> CodecTweakTool Paso a paso para quitar Avi Chunk Viewer
  2. If you have a recent version of K-Lite Codec Pack, this screen will appear:
    Siquiete paso para quitar Avi Chunk Viewer
    Click the "Manage DirectShow filters" button .If you have an old version of K-Lite Code Pack, no box will appear (skip to step 3).
  3. Near the end (move the scroll bar down) you will see a white little square next says "AVI splitter (Gabest)" or "AVI splitter (Gabest) [avisplitter.ax]". Click the square to display a "V" (as shown in the following figure). Paso final para desinstalar Avi Chunk Viewer
    Eye, not to be confused with "AVI splitter (Haali)" appearing in the image below:
    Esto no hay que hacerlo
  4. Click the button on the bottom right says "Apply & Close".
  5. Restart your PC for the changes to take effect.
And Vualá! with this, 99.9% of times not again see the heavy window "AVI Chunk Viewer".

Form "to the beast" to remove the AVI Chunk Viewer

Once you have done the official way to uninstall the AVI Chunk viever in some very few cases it refuses to disappear, or other times for various reasons is not possible to apply the above method. So explain another way to remove the AVI Chunk Viewer, we recommend you do ONLY if the above method (the officer) does not work:
  1. You should look for the "C: \ windows \ system32 \" folder
  2. Inside that folder look for a file called "AVCDX.ax". If you can not find it, look for this other "avisplitter.ax". And if you still can not find it, look for any file that begins with "av" and ends with ".ax". When you find it, rename or delete it (personally I delete, but if you do not trust, give it another name like "loquesea.ax.BAK").
  3. Search with the Windows file browser the text string "AviSplitter.ax" (without the quotes) and when you find it, delete it. Generally, the "AviSplitter.ax" module is in the "C: \ Program Files \ FreeTime \ FormatFactory \ FFModules \ Filters \" folder or "C: \ Program files \ FreeTime \ FormatFactory \ FFModules \ Filters \" (or similar). Sometimes in "C: \ Windows \ System32"
  4. Restart Windows.
And that's all, I hope this has been helpful information from Dr.PC please let us'd stop any comments to know how you got on.
4:24 PM

Making several videos have the same volume

The process of several videos have the same volume, also called normalize multiple video files. These videos can be movies, YouTube videos, or other sources.
The normalization of multiple video files at a time, can be obtained in two ways: either temporarily or permanently. We will discuss the program to normalize the sound of the videos, but if you want to do just to MP3, there is another alternative program .
The temporary, means using the program that visualize videos (to such programs are called "video player"), if the program is minimally good in their settings audio should have an option to activate Normalizing audio.
For example in the player called VLC (for me the best and above is free) you can find this option in
Tools -> Preferences -> Audio -> Filters -> box that says: Volume Normalizer.
The permanent form means either manually or automatically with a program to make multiple videos have the same volume, you must perform the following steps:
  • Extract audio track.
  • Normalize the volume to 89db (is the optimal point, if it gets stronger or appears distorted sounds like a fried egg friese, if it gets lower at times is too low).
  • Coding standard audio track.
  • Replace the old audio track of the video by the new.
This is achieved do everything automatically with a free program called "BS FAG" whose official website is this , or you can download the program directly from Freewarefiles is now version 2.5.1.
The manual of this article is based on the "Version 2.3.0 BS FAG "but recommend that you use the updated version" BS FAG 2.5.1 or later ". Once you've downloaded and installed the program, you can start. When you run it can do two things: either press the "Add" button or drag the videos to the program window. Then you click the button below that says "Process" and you're done, the program will do everything automatically.
bs-fag es un programa para que varios vídeos tengan el mismo volumen
Once you have completed the process, all processed videos have the same volume. In the "Gain" column volume gain appears, as seen in the image on some videos was uploaded them more volume than others, because the volume was lower than the other videos and the program compensates by raising a little more volume than the rest.
And finally, if when you select videos to make the normalization of sound, and get a mysterious error message (I say mysterious because you do not clarify anything), it is usually due to two reasons:
  • Not a video file (eg if you put an image, or an MP3 music file type).
  • It is a correct video, but has "non-English characters". For example the name contains accents, ñ, ce trencadas ("ç"), umlauts, "eles geminadas", etc. If you pass this, rename the file with the same name but replaces the "letters problematic". For example "The f u tbol Bar ç a 2005.avi" and would "tbol The f u c a 2005.avi Bar".
I forgot in the configuration section you can pass parameters to modify the result, although it is quite complex. Who would be interested, these parameters can be found in the section dedicated to the volume of FFmpeg program (in English).
If you like the advanced options, you can research how to do this normalization process using more sophisticated techniques. I recommend the mini guide videohelp.com Forum (in English), which explain programs to extract data from audio and tricks for standardization, using batch type processes BATCH.
I hope this article helps someone to save time, because my cost me a lot to find a program. :)